On this page
Last updated: November 21, 2022.
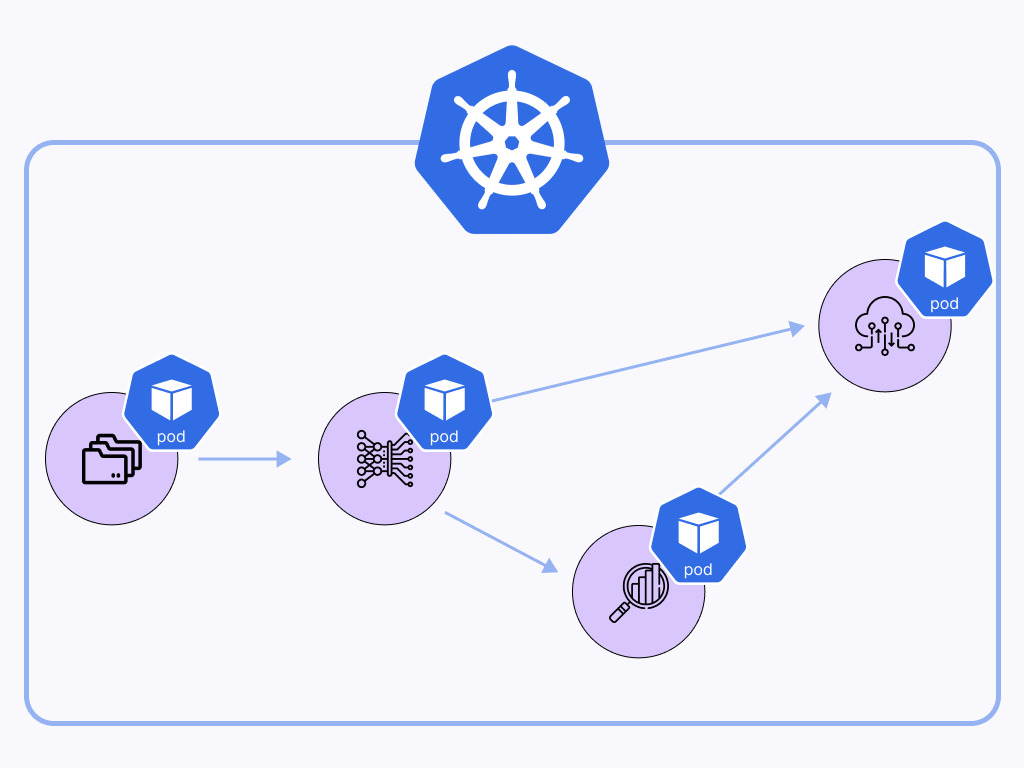
Orchestrating ML workflows natively in Kubernetes has been one of the most requested features at ZenML. We have heard you and have just released a brand new Kubernetes-native orchestrator for you, which executes each pipeline step in a separate pod, streams the logs of all pods to your terminal, and even supports CRON job scheduling.
Now, why would we want to orchestrate ML workflows natively in Kubernetes in the first place when ZenML already integrates with Kubeflow, which can run jobs on Kubernetes for us? Well, Kubeflow is an awesome, battle-tested tool, and it certainly is the most production-ready Kubernetes orchestration tool out there. However, Kubeflow also comes with a lot of additional requirements and general added complexity that not every team might want:
- Kubeflow Pipelines (kfp) alone requires a list of 21 other packages aside from Kubernetes
- It includes a UI that you might not need as well as a lot of Google Cloud specific functionality that is essentially dead code if you are using a different cloud provider.
- Most importantly, someone must install it on your cluster, configure it, and actively manage it.
If you are looking for a minimalist, lightweight way of running ML workflows on Kubernetes, then this post is for you: By the time we are done, you will be able to orchestrate ML pipelines on Kubernetes without any additional packages apart from the official Kubernetes Python API.
Best of all, if you build out the stack described in this tutorial and then later want to switch to a Kubeflow setup, it will be as easy as changing the orchestrator in your ZenML stack with a single line of code, so you are not locked into anything!
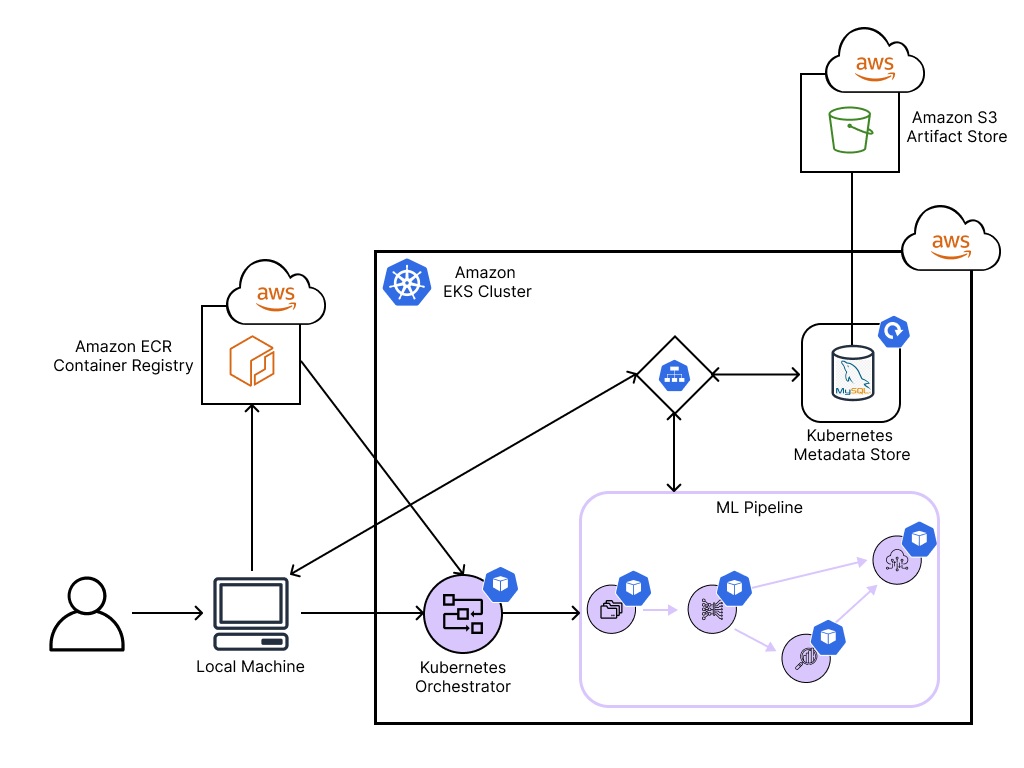
So, let’s get into it and use the new Kubernetes-native orchestrator to easily run ML workflows in a distributed and scalable cloud setting on AWS. To do so, we will provision various resources on AWS: an S3 bucket for artifact storage, an ECR container registry, as well as an Amazon EKS cluster, on which the Kubernetes-native components will run.
The following figure shows an overview of the MLOps stack we will build throughout this tutorial:
Setting Up AWS Resources
In this example, we will use AWS as our cloud provider of choice and provision an EKS Kubernetes cluster, an S3 bucket to store our ML artifacts, and an ECR container registry to manage the Docker images that Kubernetes needs. However, this could also be done in a similar fashion on any other cloud provider.
In this tutorial, we provide two methods on how to provision infrastructure. Choose the one that you are more comfortable with!
Requirements
In order to follow this tutorial, you need to have the following software installed on your local machine:
- Python (version 3.7-3.9)
- Docker installed on your machine
- kubectl
- AWS CLI installed on your machine and authenticated
- Remote ZenML Server A Remote Deployment of the ZenML HTTP server and Database
🚅 Take the Express Train: Terraform-based provisioning of resources
If you’re looking for a really quick way to have all the resources deployed and ready, we have something interesting for you! We are building a set of “recipes” for the most popular MLOps stacks so that you can get to the execution phase faster.
Take a look at mlops-stacks by ZenML 😍. It’s open-source and maintained by the ZenML core team.
Now, coming back to the setup, you can leverage the “eks-s3-seldon-mlflow” recipe for this example.
Note You need to have Terraform installed to continue.
Follow these steps and you’ll have your stack ready to be registered with ZenML!
- Clone the repository.
- Move into the “eks-s3-seldon-mlflow” directory and open the locals.tf file.
- Edit the “prefix” variable to your desired name and modify any other variables if needed.
- Now, run the following command.
terraform initThis will download some provider information to your repository and can take up to a minute to run.
- After the init has completed, you can now apply your resources. For that, execute this command.
terraform applyThis will give you an overview of all resources that will be created. Select “yes” and just sit back 😉 It can take up to 20 minutes to set everything up.
- Your stack is now ready! 🚀
Now you can skip directly to configuring your local Docker and kubectl! 😎
🚂 Take the Slower Train: Manual provisioning of resources
If you would like to manually provision the resources instead of using the Terraform-based approach described above, this section is for you. You can skip this section if you already have the resources deployed at this point.
EKS Setup
First, create an EKS cluster on AWS according to this AWS tutorial.
S3 Bucket Setup
Next, let us create an S3 bucket where our ML artifacts can later be stored. You can do so by following this AWS tutorial.
The path for your bucket should be in this format s3://your-bucket.
Now we still need to authorize our EKS cluster to access the S3 bucket we just created. For simplicity, we will do this by simply assigning an AmazonS3FullAccess policy to the cluster node group’s IAM role.
ECR Container Registry Setup
Since each Kubernetes pod will require a custom Docker image, we will also set up an ECR container registry to manage those. You can do so by following this AWS tutorial.
Configure your local kubectl and Docker
All that is left to do is to configure your local kubectl to connect to the EKS cluster and to authenticate your local Docker CLI to connect to the ECR.
Note If you have used Terraform above, you can obtain the values needed for the following commands by looking at the output of the terraform apply command.
aws eks --region <aws_region> update-kubeconfig
    --name <aws_eks_cluster>
    --alias <kube_context>
</kube_context></aws_eks_cluster></aws_region>
aws ecr get-login-password --region <aws_region> | docker login
--username AWS
--password-stdin
<ecr_registry_name>
</ecr_registry_name></aws_region>Remote ZenML Server
For Advanced use cases where we have a remote orchestrator such as Vertex AI or to share stacks and pipeline information with team we need to have a separated non local remote ZenML Server that it can be accessible from your machine as well as all stack components that may need access to the server. Read more information about the use case here
In order to achieve this there are two different ways to get access to a remote ZenML Server.
- Deploy and manage the server manually on your own cloud/
- Sign up for ZenML Enterprise and get access to a hosted version of the ZenML Server with no setup required.
Run an example with ZenML
Let’s now see the Kubernetes-native orchestration in action with a simple example using ZenML.
The following code defines a four-step pipeline that loads NumPy training and test datasets, checks them for training-serving skew with Facets, trains a sklearn model on the training set, and then evaluates it on the test set:
import numpy as np
import pandas as pd
from sklearn.base import ClassifierMixin
from sklearn.svm import SVC
from zenml.integrations.constants import FACETS, SKLEARN
from zenml.integrations.facets.visualizers.facet_statistics_visualizer import (
    FacetStatisticsVisualizer,
)
from zenml.integrations.sklearn.helpers.digits import get_digits
from zenml.pipelines import pipeline
from zenml.repository import Repository
from zenml.steps import Output, step
from zenml.config import DockerSettings

@step
def importer() -> Output(
    X_train=np.ndarray, X_test=np.ndarray, y_train=np.ndarray, y_test=np.ndarray
):
    """Loads the digits array as normal numpy arrays."""
    X_train, X_test, y_train, y_test = get_digits()
    return X_train, X_test, y_train, y_test

@step
def svc_trainer(
    X_train: np.ndarray,
    y_train: np.ndarray,
) -> ClassifierMixin:
    """Train a sklearn SVC classifier."""
    model = SVC(gamma=0.001)
    model.fit(X_train, y_train)
    return model

@step
def evaluator(
    X_test: np.ndarray,
    y_test: np.ndarray,
    model: ClassifierMixin,
) -> float:
    """Calculate the accuracy on the test set"""
    test_acc = model.score(X_test, y_test)
    print(f"Test accuracy: {test_acc}")
    return test_acc

@step
def skew_comparison(
    reference_input: np.ndarray,
    comparison_input: np.ndarray,
) -> Output(reference=pd.DataFrame, comparison=pd.DataFrame):
    """Convert data from numpy to pandas for skew comparison."""
    columns = [str(x) for x in list(range(reference_input.shape[1]))]
    return pd.DataFrame(reference_input, columns=columns), pd.DataFrame(
        comparison_input, columns=columns
    )

docker_settings = DockerSettings(required_integrations=[SKLEARN, FACETS])

@pipeline(enable_cache=False, settings={"docker": docker_settings})
def kubernetes_example_pipeline(importer, trainer, evaluator, skew_comparison):
    """data loading -> train -> test with skew comparison in parallel."""
    X_train, X_test, y_train, y_test = importer()
    model = trainer(X_train=X_train, y_train=y_train)
    evaluator(X_test=X_test, y_test=y_test, model=model)
    skew_comparison(X_train, X_test)

if __name__ == "__main__":
    kubernetes_example_pipeline(
        importer=importer(),
        trainer=svc_trainer(),
        evaluator=evaluator(),
        skew_comparison=skew_comparison(),
    ).run()

    repo = Repository()
    runs = repo.get_pipeline(pipeline_name="kubernetes_example_pipeline").runs
    last_run = runs[-1]
    train_test_skew_step = last_run.get_step(name="skew_comparison")
    FacetStatisticsVisualizer().visualize(train_test_skew_step)
In order to run this code later, simply copy it into a file called run.py.
Next, install zenml, as well as its sklearn, facets, kubernetes, aws, and s3 integrations:
pip install zenml
zenml integration install sklearn facets kubernetes aws s3 -y
Registering a ZenML Stack
To bring the Kubernetes orchestrator, and all the AWS infrastructure together, we will register them together in a ZenML stack.
First, initialize ZenML in the same folder where you created the run.py file:
zenml connect --url http://zenml-server... # if you have a remote server

zenml init
Next, register the Kubernetes orchestrator, using the <KUBE_CONTEXT> you used above:
zenml orchestrator register k8s_orchestrator
    --flavor=kubernetes
    --kubernetes_context=<kube_context>
    --kubernetes_namespace=zenml
    --synchronous=True
</kube_context>
Similarly, use the <ECR_REGISTRY_NAME> and <REMOTE_ARTIFACT_STORE_PATH> you defined when setting up the ECR and S3 components to register them in ZenML. If you have used the recipe, the ECR registry name would be in the format .dkr.ecr..amazonaws.com and the name of the artifact store can be taken from the output of the terraform apply command.
zenml container-registry register ecr_registry
    --flavor=default
    --uri=<ecr_registry_name>
</ecr_registry_name>
zenml artifact-store register s3_store
--flavor=s3
--path=<remote_artifact_store_path>
</remote_artifact_store_path>Now we can bring everything together in a ZenML stack:
zenml stack register k8s_stack
    -a s3_store
    -o k8s_orchestrator
    -c ecr_registry
Let’s set this stack as active, so we use it by default for the remainder of this tutorial:
zenml stack set k8s_stackSpinning Up Resources
Once all of our components are defined together in a ZenML stack, we can spin them all up at once with a single command:
zenml stack upIf everything went well, you should see logs messages similar to the following in your terminal:

Running the Example
Having all of our MLOps components registered in a ZenML stack makes it now trivial to run our example on Kubernetes in the cloud. Simply execute the following command:
python run.pyThis will first build a Docker image locally, including your ML pipeline code from run.py, then push this to the ECR, and then execute everything on the EKS cluster.
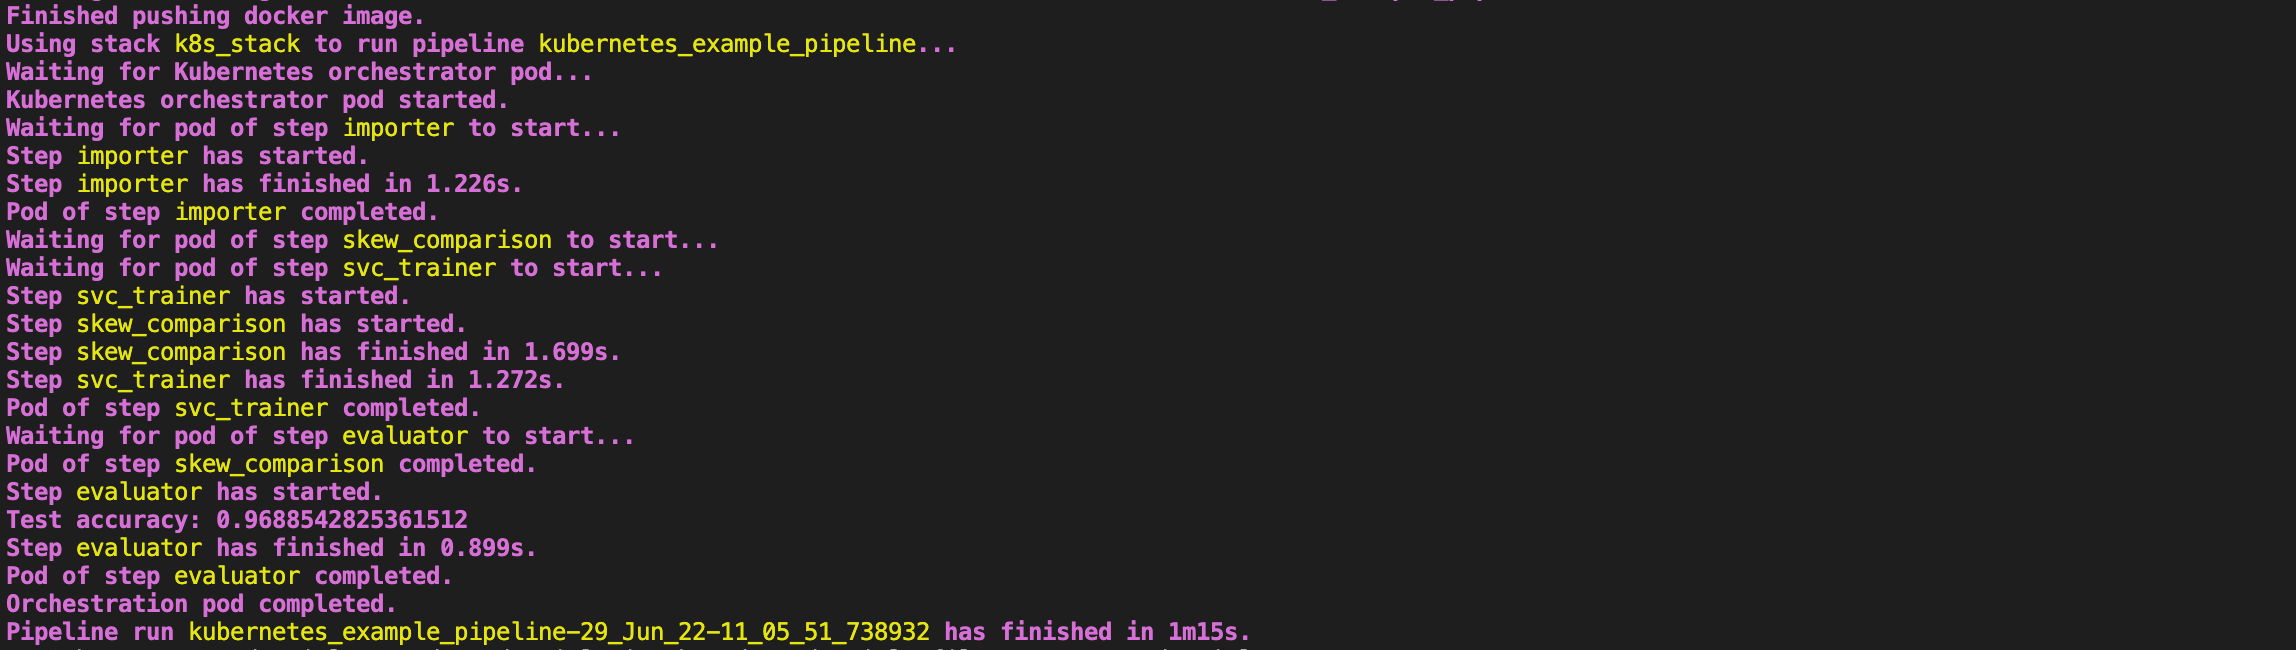
If all went well, you should now see the logs of all Kubernetes pods in your terminal, similar to what is shown below.
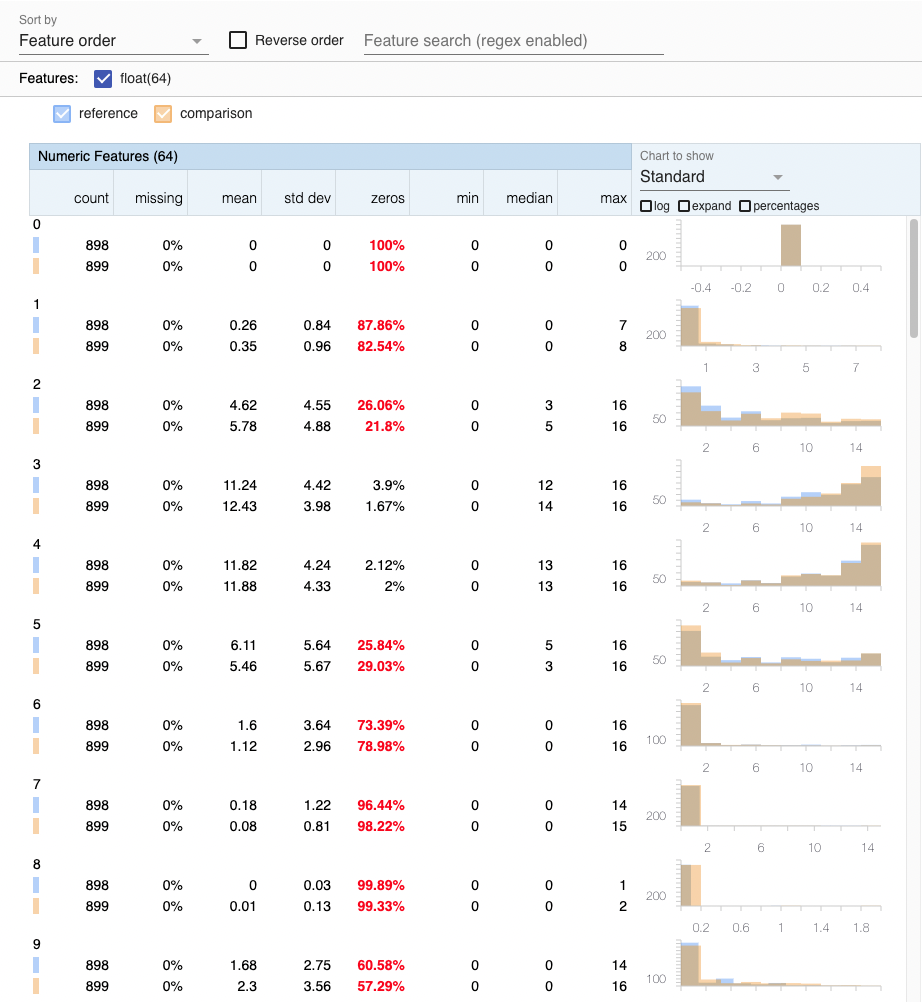
Additionally, a window should have opened in your local browser where you can see a training-serving skew analysis in Facets like the following:
When running kubectl get pods -n zenml, you should now also be able to see that a pod was created in your cluster for each pipeline step:

Cleanup
Delete Example Run Pods
If you just want to delete the pods created by the example run, execute the following command:
kubectl delete pods -n zenml -l pipeline=kubernetes_example_pipelineDelete AWS Resources
Lastly, if you even want to deprovision all of the infrastructure we created, simply delete the respective resources in your AWS console if you had created them manually.
For those of you who used the stack recipe, you can simply run the following command and it will take care of removing all resources and dependencies.
terraform destroyConclusion
In this tutorial, we learned about orchestration on Kubernetes, set up EKS, ECR, and S3 resources on AWS, and saw how this enables us to run arbitrary ML pipelines in a scalable cloud environment. Using ZenML, we were able to do all of this without having to change a single line of our ML code. Furthermore, it will now be almost trivial to switch out stack components whenever our requirements change.
If you have any questions or feedback regarding this tutorial, join our weekly community hour.
If you want to know more about ZenML or see more examples, check out our docs and examples or join our Slack.