
On this page
Last updated: November 21, 2022.
The churn rate measures the number of customers who stop paying for a company’s services or products over a specific period. An elevated churn rate indicates customer dissatisfaction with a company product or service, or better offers from the competition or a lack of customer loyalty.
Customer churn rate is one of the critical metrics for measuring a company’s customer retention; improving customer retention is a continuous process, and understanding churn rate is the first step to better customer retention. Other than that, customer churn helps identify how good or bad the product/service is, which helps determine possible areas for improvement.
AI and machine learning is increasingly used to calculate customer churn by large retailers and service providers.
This blog shows how to build a customer churn prediction system that uses customers’ historical features like services that each customer has signed up for, customer account information, and demographic information. I will be using ZenML to build an end-to-end production-grade machine learning system that can predict whether the customer will stay loyal or not, using the Telco customer churn dataset.
I show how I used a ZenML pipeline to build a customer churn model and present two deployment solutions:
- ‘Deployment using Kubeflow Pipelines’: I will be using Kubeflow Pipelines to build and run our ZenML pipelines on the cloud and deploy them in a production environment. Kubeflow is one of ZenML’s integrations so one can easily use Kubeflow Pipelines within ZenML. This makes it easy to connect other tools/frameworks to Kubeflow, and ZenML allows you easily switch between local and cloud environments. You can learn more about ZenML here.
- ‘Continuous Deployment using Seldon Core’: I will be using Seldon Core, a production-grade open-source model serving platform, to build our continuous deployment pipeline that trains a model and then serves it with Seldon Core. Seldon Core is a ZenML integration so we can easily use other tools/features within the ZenML ecosystem. One such feature is how easy it is to build a Continuous Deployment pipeline which refers to the paradigm where newly-trained models are automatically deployed to a prediction service/server when a criterion in production is fulfilled (e.g. if a trained model has a high accuracy, or overall performs better than the previous one, then deploy it in production.) ZenML allows you to build a continuous deployment pipeline by connecting it with Seldon Core without too much effort.
Deployment using Kubeflow Pipelines
To build a real-world workflow for predicting whether a customer will churn or not, you will probably develop your pipelines on your local machine initially, allowing for quick iteration and debugging. However, at a certain point, when you are finished with its design, you might want to transition to a more production-ready setting and deploy the pipeline to a more robust environment. This painless transition from development to production stack is where ZenML shines.
I will be using ZenML’s Kubeflow integration to deploy pipelines to production using Kubeflow Pipelines on the cloud. I will show you how to deploy your pipeline using Kubeflow Pipelines transitioning from local to cloud stack. ZenML supports Airflow and Kubeflow as third-party orchestrators for your ML pipeline code.
Run the pipeline regularly
Our training pipeline run_kubeflow_pipeline.py consists of the following steps:
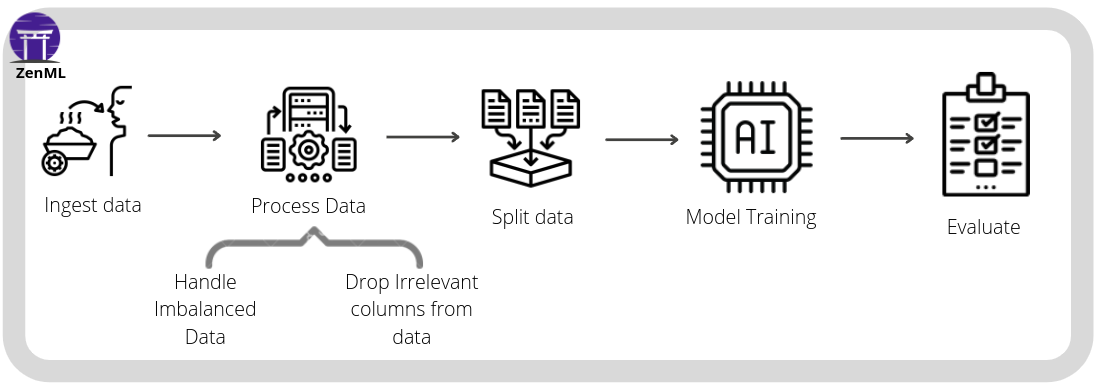
- ingest_data: Ingest the data from the source and create a DataFrame.
- encode_cat_cols: Encode categorical columns.
- drop_cols: Dropping irrelevant columns.
- data_splitter: Split the data into training and test sets.
- model_trainer: Train the model.
- evaluation: Evaluate the trained model.
If you want to run the pipeline with default stack settings (i.e. you can run the whole pipeline as traditional ZenML pipelines), you can run the following command to run it:
zenml init
python run_kubeflow_pipeline.py
Run the same pipeline on a local Kubeflow Pipelines deployment
Previously I ran our pipeline in default stack settings; now, I will transition our pipeline to a more production-ready stage and deploy the pipeline to a more robust environment. In this section, I will run the same pipeline on a local Kubeflow Pipelines deployment.
With all the installation and initialization out of the way, all that’s left to do is configure our ZenML stack. For this example, the stack we create consists of the following four parts:
- The local artifact store stores step outputs on your hard disk.
- The Docker images created to run your pipeline are stored in a local Docker container registry.
- The Kubeflow orchestrator is responsible for running your ZenML pipeline in Kubeflow Pipelines. An orchestrator manages the running of each step of the pipeline, administering the actual pipeline runs.
# Make sure to create the local registry on port 5000 for it to work
zenml container-registry register local_registry --flavor=default --uri=localhost:5000
zenml orchestrator register kubeflow_orchestrator --flavor=kubeflow
zenml stack register local_kubeflow_stack \
    -a default \
    -o kubeflow_orchestrator \
    -c local_registry

# Activate the newly created stack
zenml stack set local_kubeflow_stack
Now, we need to start the Kubeflow Pipelines stack locally; all we need to do is run:
zenml stack upWe can now run the pipeline by simply executing the Python script:
python run_kubeflow_pipeline.pyBy running the script, it will build a Docker image containing all the necessary Python packages and files, push it to the local container registry and schedule a pipeline run in Kubeflow Pipelines. Once the script is finished, you should be able to see the pipeline run here.
Transitioning to Production with Kubeflow on AWS
Now I will transition our pipeline to a more production-ready setting and deploy it in a more robust environment because I don’t want to deploy our pipeline locally; I want to deploy it on the cloud. I need to deploy it on the cloud because training and deploying ML/DL models can be memory-intensive and requires more compute power to train the model. ZenML makes it painless to transition from local stack to cloud. In this section, I will run the same pipeline on a Kubeflow Pipelines deployment on AWS.
There are three steps to continue:
- Set up the necessary cloud resources on the provider of your choice
- Deploy a Remote ZenML Server
- Configure ZenML with a new stack to be able to communicate with these resources
I will now run the same pipeline in Kubeflow Pipelines deployed to an AWS EKS cluster. Before running this, you need some additional setup or prerequisites to run the pipeline on AWS
Setup Infrastructure with ZenML Stack recipes:
With ZenML Stack Recipes, you can now provision all the infrastructure you need to run your ZenML pipelines with just a few simple commands.
The flow to get started for this example can be the following:
- Pull this recipe to your local system.
zenml stack recipe pull aws-minimal-
🎨 Customize your deployment by editing the default values in the locals.tf file.
-
🔐 Add your secret information like keys and passwords into the values.tfvars.json file which is not committed and only exists locally.
-
🚀 Deploy the recipe with this simple command.
zenml stack recipe deploy aws-minimalNote If you want to allow ZenML to automatically import the created resources as a ZenML stack, pass the —import flag to the command above. By default, the imported stack will have the same name as the stack recipe and you can provide your own with the —stack-name option.
- You’ll notice that a ZenML stack configuration file gets created after the previous command executes 🤯! This YAML file can be imported as a ZenML stack manually by running the following command.
zenml stack import <stack-name> <path-to-the-created-stack-config-yaml>
</path-to-the-created-stack-config-yaml></stack-name>
Note
You need to have your AWS credentials saved locally under ~/.aws/credentials
You can now skip directly to the part of this guide where you define ZenML secrets for Seldon!
Remote ZenML Server
In advanced use cases, for example when you have a remote orchestrator (such as Vertex AI) or when you want to collaborate with a team, you need to set up a non-local remote ZenML server. This server acts as a central component that communicates with all other stack components.
More information about the use cases here.
To achieve this there are two different ways to get access to a remote ZenML Server.
- Deploy and manage the server manually on your own cloud.
- Sign up for ZenML Enterprise and get access to a hosted version of the ZenML Server with no setup required.
Configure ZenML with a new stack
Now, I will configure the Kubeflow Pipelines stack on AWS and run the pipeline on AWS; the following are the steps for doing so:
- Install the cloud provider
zenml integration install aws- Register the stack components
zenml container-registry register cloud_registry --flavor=default --uri=$PATH_TO_YOUR_CONTAINER_REGISTRY
zenml orchestrator register cloud_orchestrator --flavor=kubeflow --custom_docker_base_image_name=YOUR_IMAGE
zenml artifact-store register cloud_artifact_store --flavor=s3 --path=$PATH_TO_YOUR_BUCKET

# Register the cloud stack
zenml stack register cloud_kubeflow_stack -a cloud_artifact_store -o cloud_orchestrator -c cloud_registry- Activate the newly-created stack
zenml stack set cloud_kubeflow_stack- Run the pipeline
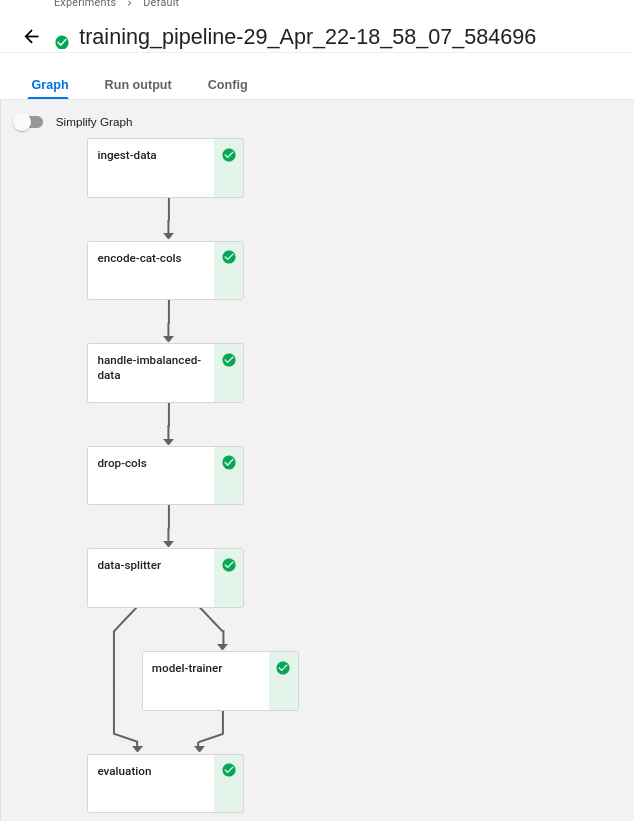
python run_kubeflow_pipeline.py train- Configure port forwarding and check the Kubeflow UI to see if the model is deployed and running! 🚀
kubectl --namespace kubeflow port-forward svc/ml-pipeline-ui 8080:80To see the UI, you can go to the localhost URL. If everything is working, you should see the model deployed and running as below:
Connecting Kubeflow Pipelines with Streamlit
We have a running pipeline deployed using Kubeflow Pipelines on AWS. Now I can connect the pipeline to a data application like Streamlit to use the model for prediction. The following code is the core logic for connecting the pipeline to Streamlit:
repo = Repository()
p = repo.get_pipeline("training_pipeline")
last_run = p.runs[-1]
trainer_step = last_run.get_step("model_trainer")
model = trainer_step.output.read()

input_details = [..., ..., ...]
pred = model.predict(input_details)
I’m fetching the training_pipeline from the ZenML repository and taking the last run of the pipeline. Then, I’m bringing the model_trainer step from the previous run and reading the model from the model_trainer step. After that, I fetch the input details from the user and use the model to predict the output.
You can run the Streamlit app by running the following command:
streamlit run streamlit_apps/streamlit_app_kubeflow.pyContinuous model deployment with Seldon Core
While building the real-world workflow for predicting whether a customer will churn or not, you might not want to train the model once and deploy it to production. Instead, you might want to train the model and deploy it to production when something gets triggered. This is where one of our recent integrations is valuable: Seldon Core.
Seldon Core is a production-grade open-source model serving platform. It packs a wide range of features built around deploying models to REST/GRPC microservices, including monitoring and logging, model explainers, outlier detectors, and various continuous deployment strategies such as A/B testing and canary deployments, and more.
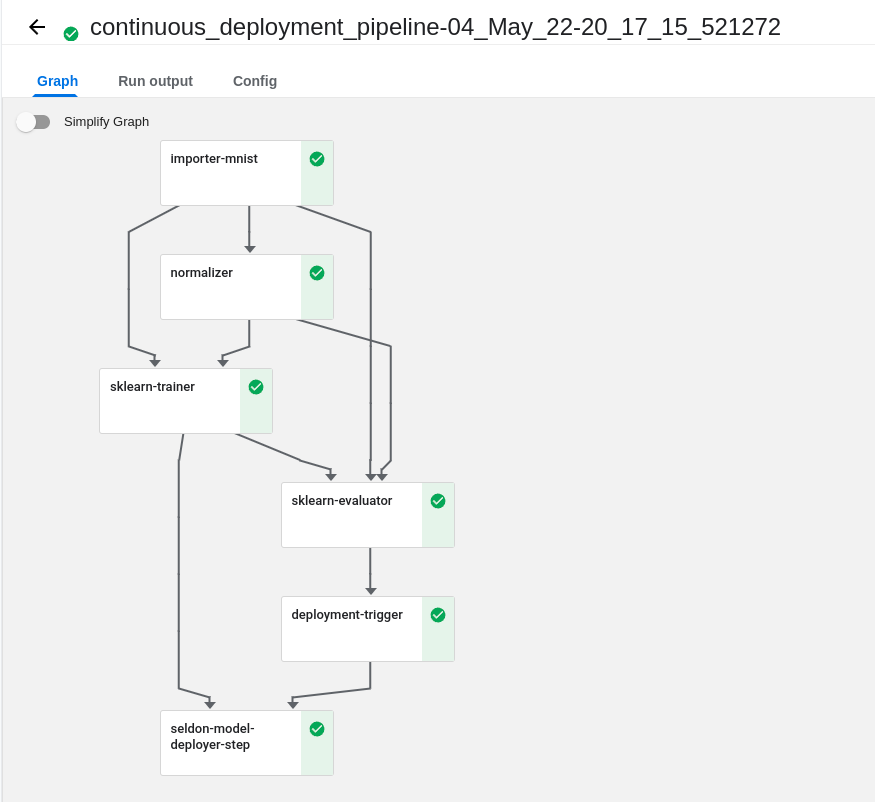
In this project, I built a continuous deployment pipeline that trains a model and then serves it with Seldon Core as the industry-ready model deployment tool of choice. If you are interested in learning more about Seldon Core, you can check out the ZenML example. The following diagram shows the flow of the whole pipeline:

Let’s set up our full AWS stack to run the pipeline using Seldon Core.
- Install the Seldon Core integration, a set of ZenML extensions that integrate with Seldon Core.
zenml integration install seldon- Register the stack components
# Create a Kubernetes configuration context that points to the EKS cluster
aws eks --region {AWS_REGION} update-kubeconfig --name {AWS_EKS_CLUSTER} --alias {KUBE_CONTEXT}
To configure ECR registry access locally, follow these instructions, or simply type the following with the right container registry address:
# Point Docker to the ECR registry
aws ecr get-login-password --region {AWS_REGION} | docker login --username AWS --password-stdin {ECR_REGISTRY_NAME}
Extract the URL where the Seldon Core model server exposes its prediction API, e.g.:
export INGRESS_HOST=$(kubectl -n istio-system get service istio-ingressgateway \
  -o jsonpath='{.status.loadBalancer.ingress[0].hostname}')
Configuring the stack can be done like this:
zenml integration install s3 aws kubeflow Seldon

# Register container registry
zenml container-registry register ecr_registry --flavor=default --uri={ECR_REGISTRY_NAME}

# Register orchestrator (Kubeflow on AWS)
zenml orchestrator register eks_orchestrator --flavor=kubeflow --kubernetes_context={KUBE_CONTEXT} --synchronous=True

# Register artifact store
zenml artifact-store register s3_store --flavor=s3 --path={S3_BUCKET_NAME}

# Register the Seldon Core model deployer (Seldon on AWS)
zenml model-deployer register eks_seldon --flavor=seldon --kubernetes_context={KUBE_CONTEXT} --kubernetes_namespace={KUBEFLOW_NAMESPACE} --base_url=http://{INGRESS_HOST[0]} --secret=s3_store

# Register a secret manager
zenml secrets-manager register aws_secret_manager --flavor=aws

# Register the aws_kubeflow_stack
zenml stack register aws_kubeflow_stack -a s3_store -o eks_orchestrator -c ecr_registry -d eks_seldon -x aws_secret_manager- Activate the newly-created stack
zenml stack set aws_kubeflow_stack- Run a pipeline
python run_seldon_deployment_pipeline.py --secret seldon-init-container-secret --deployYou can control which pipeline to run, bypassing the —deploy and the —predict flag to the run_seldon_deployment_pipeline.py launcher. If you run the pipeline with the —deploy flag, the pipeline will train the model and deploy if the model meets the evaluation criteria, and then Seldon Core will serve the model for inference. If you run the pipeline with the —predict flag, this tells the pipeline only to run the inference pipeline and not the training pipeline.
You can also set the —min-accuracy to control the evaluation criteria.
- Configure port forwarding and check the Kubeflow UI to see if the model is deployed and running! 🚀
kubectl --namespace kubeflow port-forward svc/ml-pipeline-ui 8080:80To see the UI, you can go to the localhost:8080. If everything is working, you should see the model deployed and running as below:
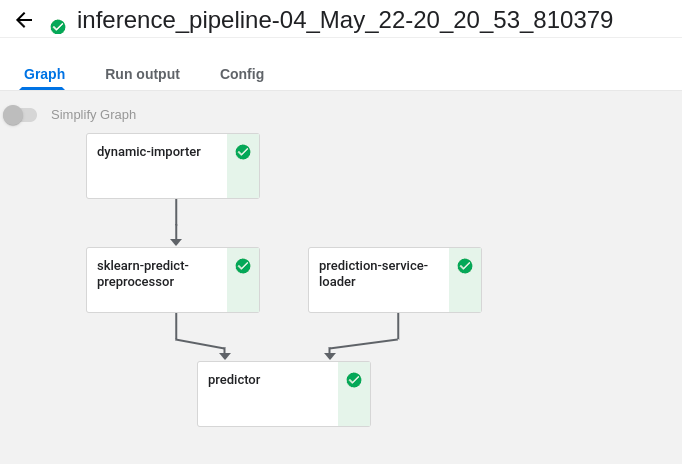
If you want to run the pipeline with the —predict flag, you can run the following command to run the pipeline:
python run_seldon_deployment_pipeline.py --secret seldon-init-container-secret --predictThis will run the inference pipeline that will serve the model for inference. You can check the model is serving by going to the localhost:8080 and see the model is serving as below in your inference pipeline run:
Connecting Seldon Core Pipelines with Streamlit
Now I have deployed our pipeline using Seldon Core. I’m going to connect the pipeline with Streamlit to make inferences from our model service. The following code is the core logic for connecting the pipeline to Streamlit:
from zenml.services import load_last_service_from_step
service = load_last_service_from_step(
            pipeline_name="continuous_deployment_pipeline",
            step_name="model_deployer",
            running=True,
        )
input_details = [..., ..., ...]
data = np.array(input_details)
pred = service.predict(input_details)
I’m fetching our model_deployer step from the continuous_deployment_pipeline pipeline and retrieving the model service using the load_last_service_from_step function, making use of the predict method to make an inference.
What we learned
In this blog post, I showed you how to build a production-grade machine learning system that can predict customer churn. I showed you how to deploy the pipeline using Kubeflow Pipelines and transition from the default setting to the production setting. I also showed you how to build a continuous deployment pipeline using Seldon Core which I deployed on AWS. I also showed you how to connect the pipeline with Streamlit for inference from our model service.
If you’re interested in learning more about ZenML, visit our Github page, read our docs. If you have questions or want to talk through your specific use case, feel free to reach out to us on Slack!