On this page
Last updated: December 14, 2022.
It can be hard to deploy a machine learning model. There are several factors that need to be considered, such as how the model will be integrated into the existing infrastructure, whether it will be deployed ‘on premises’ or in the cloud, and how to handle potential issues such as data privacy and security. Additionally, the performance of the model in production can often differ from its performance during training, so careful monitoring and testing are necessary to ensure that it is working as expected. It is also important to have a plan in place for maintaining and updating the model over time, as the data and requirements for the model may change.
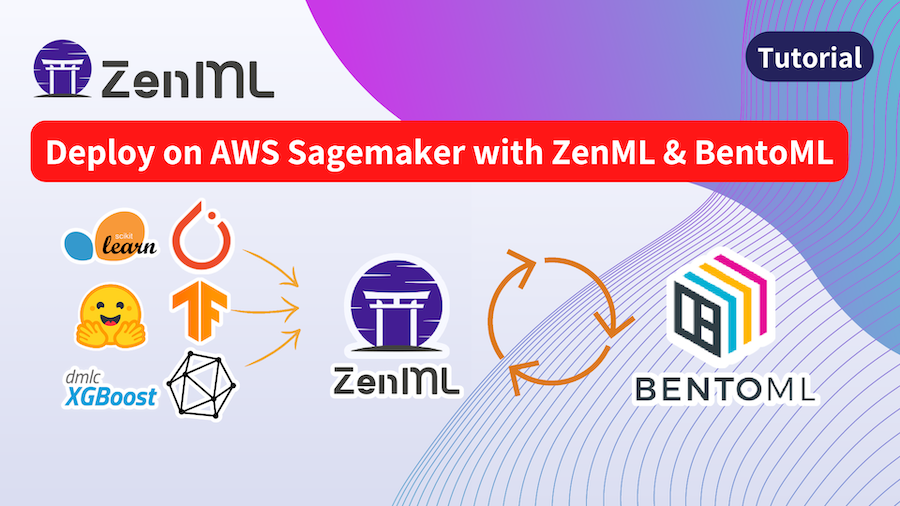
One way to make the deployment of machine learning models easier is to use pipelines. A pipeline is a series of steps that are performed on the data in order to train and deploy the model. This can include tasks such as preprocessing the data, training the model, and evaluating its performance. Using a pipeline can streamline the deployment process and make it more efficient. Tools such as ZenML and BentoML can be used to build and manage pipelines, and to package and deploy machine learning models, making the process even easier.
By using ZenML pipelines and the deployment integrations, the deployment of machine learning models can be made more efficient and less challenging. Are you ready to take your machine learning models to the next level? Model serving and deployment is where the rubber meets the road, allowing your trained models to make predictions in real-time and drive business decisions. Get ready to unleash the power of your ML models on the world with ZenML and BentoML!
In this article, you will learn how to:
- Setup ZenML and BentoML as an integration
- Define a pipeline to train and deploy model locally
- Switch from a local deployed model to a Sagemaker (cloud) endpoint
Setup
ZenML: is an extensible, open-source MLOps framework for creating portable, production-ready MLOps pipelines. It’s built for data scientists, ML engineers, and MLOps developers to collaborate as they develop to production. ZenML has simple, flexible syntax, is cloud- and tool-agnostic, and has interfaces/abstractions that are catered towards ML workflows. ZenML brings together all your favorite tools in one place so you can tailor your workflow to cater to your needs.
ZenML consists of three core concepts that allow the framework to be data-centric and also cloud-tool-agnostic. These are steps, pipelines, and stacks:
Pipelines: A pipeline consists of a series of steps, organized in any order that makes sense for your use case. These pipelines and steps are defined in code using Python decorators or classes.
Stacks: A stack is the configuration of the underlying infrastructure and choices around how your pipeline will be run. For example, you can choose to run your pipeline locally or on the cloud by changing the stack you use.
We will learn more about these concepts below. But first, let’s install ZenML. All we have to do is run:
pip install zenml["server"]
# ZenML comes with a dashboard that we can lunch using:
zenml up
BentoML: is an open-source framework for machine learning model serving. It can be used to serve and deploy models locally, in a cloud environment, or on a Kubernetes cluster. BentoML standardizes the way that models are deployed to production within an organization, making it easier to manage and maintain them.
To install BentoML we use ZenML’ CLI integration command which handles this for us:
zenml integration install bentomlNow that we have both tools installed we want to create a ZenML stack that will define how the pipeline will be run. A stack in ZenML consists of multiple stack components and these can be configured as follows:
zenml model-deployer register bentoml_deployer --flavor=bentoml
zenml stack register local_bentoml_stack \
  -a default \ # refers to the artifact-store stack component
  -o default \ # refers to the orchestrator stack component
  -d bentoml_deployer \ # refers to the model-deployer stack component
  --set # sets the stack as the active stack
**
In order to understand how we can deploy models with ZenML and BentoML we will PyTorch to train a classifier on the fashion-mnist dataset.
The full example can be found in ZenML’s core repository here
For more detailed information about stack components, integrations and ZenML in general you can find it in the docs here
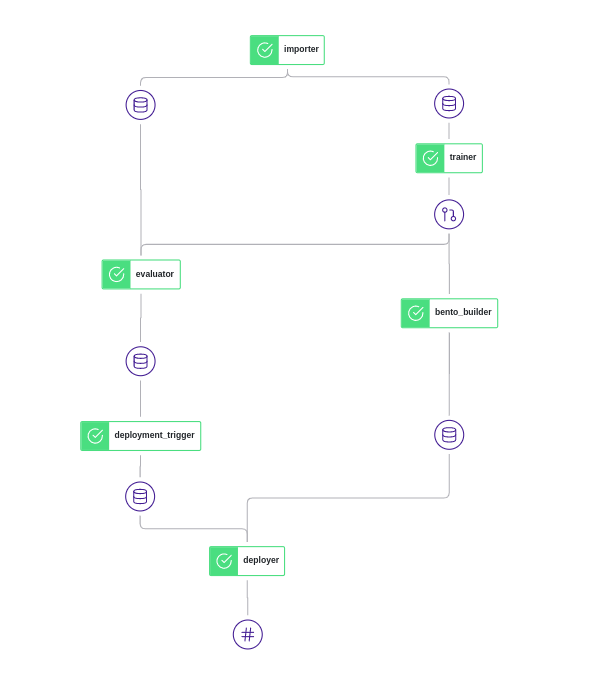
Training Deployment Pipeline
To make this more easily understandable and cleaner we will be splitting the code into two different pipelines. The first one will be the training pipeline, which consists of the following six steps:
- Load the Fashion-MNIST dataset: This step loads the Fashion-MNIST dataset, which is a popular toy dataset for training image classification models.
- Train a classifier: In this step, we train a classifier on the Fashion-MNIST dataset using a machine learning algorithm of our choice. This could be a simple model like logistic regression or a more complex model like a convolutional neural network (CNN).
- Evaluator: After training the classifier, we use the Evaluator step to evaluate the performance of the model on a held-out test set. This allows us to assess the accuracy, precision, and other metrics of our model and helps us determine whether it is ready for deployment.
- Deployment_trigger: The deployment_trigger step is used to specify when and how the model should be deployed. This step allows us to set certain conditions, such as the performance of the model on the test set, that must be met before the model is deployed.
- Bento Builder: The bento_builder step converts the trained model and packages it into a format that can be easily deployed and served. This step is important because it allows us to easily share and deploy our trained model to different environments, such as a local machine or the cloud.
- Deployer: The deployer step takes the packaged model from the previous step and deploys it to a local server.
The pipeline can be defined like this:
@pipeline(enable_cache=False, settings={"docker": docker_settings})
def training_fashion_mnist(
    importer,
    trainer,
    evaluator,
    deployment_trigger,
    bento_builder,
    deployer,
):
    """Link all the steps and artifacts together"""
    train_dataloader, test_dataloader = importer()
    model = trainer(train_dataloader)
    accuracy = evaluator(test_dataloader=test_dataloader, model=model)
    decision = deployment_trigger(accuracy=accuracy)
    bento = bento_builder(model=model)
    deployer(deploy_decision=decision, bento=bento)
Then each of these steps can be defined on their own. Let’s take a look at how the trainer step is defined, for example:
import torch
from torch import nn
from torch.utils.data import DataLoader
from neuralnetwork import NeuralNetwork
from zenml.steps import step

@step(enable_cache=True)
def trainer(train_dataloader: DataLoader) -> nn.Module:
    """Trains on the train dataloader"""
    model = NeuralNetwork().to(DEVICE)
    loss_fn = nn.CrossEntropyLoss()
    optimizer = torch.optim.SGD(model.parameters(), lr=1e-3)
    size = len(train_dataloader.dataset)
    model.train()
    for batch, (X, y) in enumerate(train_dataloader):
        X, y = X.to(DEVICE), y.to(DEVICE)

        # Compute prediction error
        pred = model(X)
        loss = loss_fn(pred, y)

        # Backpropagation
        optimizer.zero_grad()
        loss.backward()
        optimizer.step()

        if batch % 100 == 0:
            loss, current = loss.item(), batch * len(X)
            print(f"loss: {loss:>7f}  [{current:>5d}/{size:>5d}]")
    return model
Once the model is trained, the next step is the bento_builder step, which is a built-in ZenML step that makes it easier to prepare your model for deployment with BentoML. This step builds a Bento, which is an artifact that packages the model, requirements, and custom pre- and post-processing code in one file that can be used to deploy the model anywhere. The bento_builder step can be referenced as follows:
from zenml.integrations.bentoml.steps import (
    BentoMLBuilderParameters,
    bento_builder_step,
)

bento_builder = bento_builder_step(
    params=BentoMLBuilderParameters(
        model_name=MODEL_NAME,
        model_type="pytorch",
        service="service.py:svc",
        labels={
            "framework": "pytorch",
            "dataset": "mnist",
            "zenml_version": "0.21.1",
        },
        exclude=["data"],
        python={
            "packages": ["zenml", "torch", "torchvision"],
        },
    )
)
This step takes the trained model and creates a Bento artifact that can be used for deployment. This is an important step because it allows us to easily share and deploy our trained model to different environments.
The last step in our pipeline is the deployment step, which deploys the packaged file called the Bento that contains everything we need to deploy the trained model. The deployment step is also a built-in ZenML step that can be easily referenced to deploy the model to a local machine:
from zenml.integrations.bentoml.steps import (
    BentoMLDeployerParameters,
    bentoml_model_deployer_step,
)

bentoml_model_deployer = bentoml_model_deployer_step(
    params=BentoMLDeployerParameters(
        model_name=MODEL_NAME,
        port=3001,
        production=False,
    )
)
After defining all these steps and the pipeline we can run the pipeline which will give us the following:
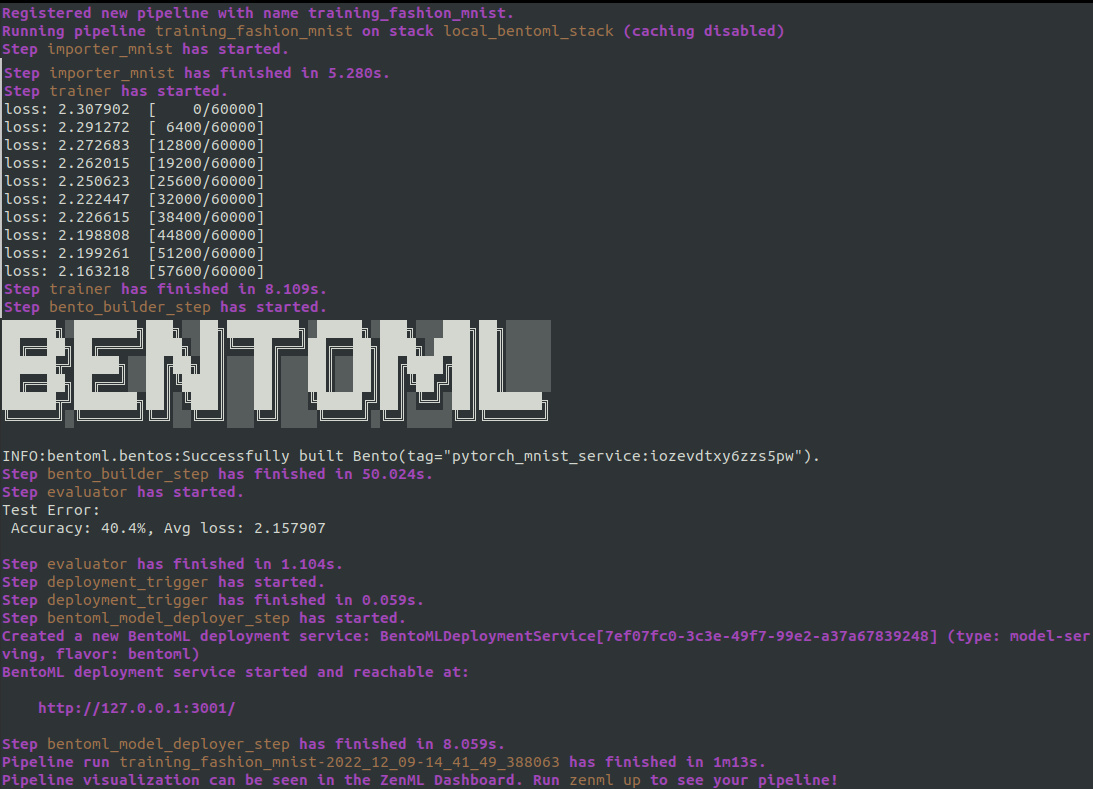
In the ZenML dashboard we can see the pipeline DAG:
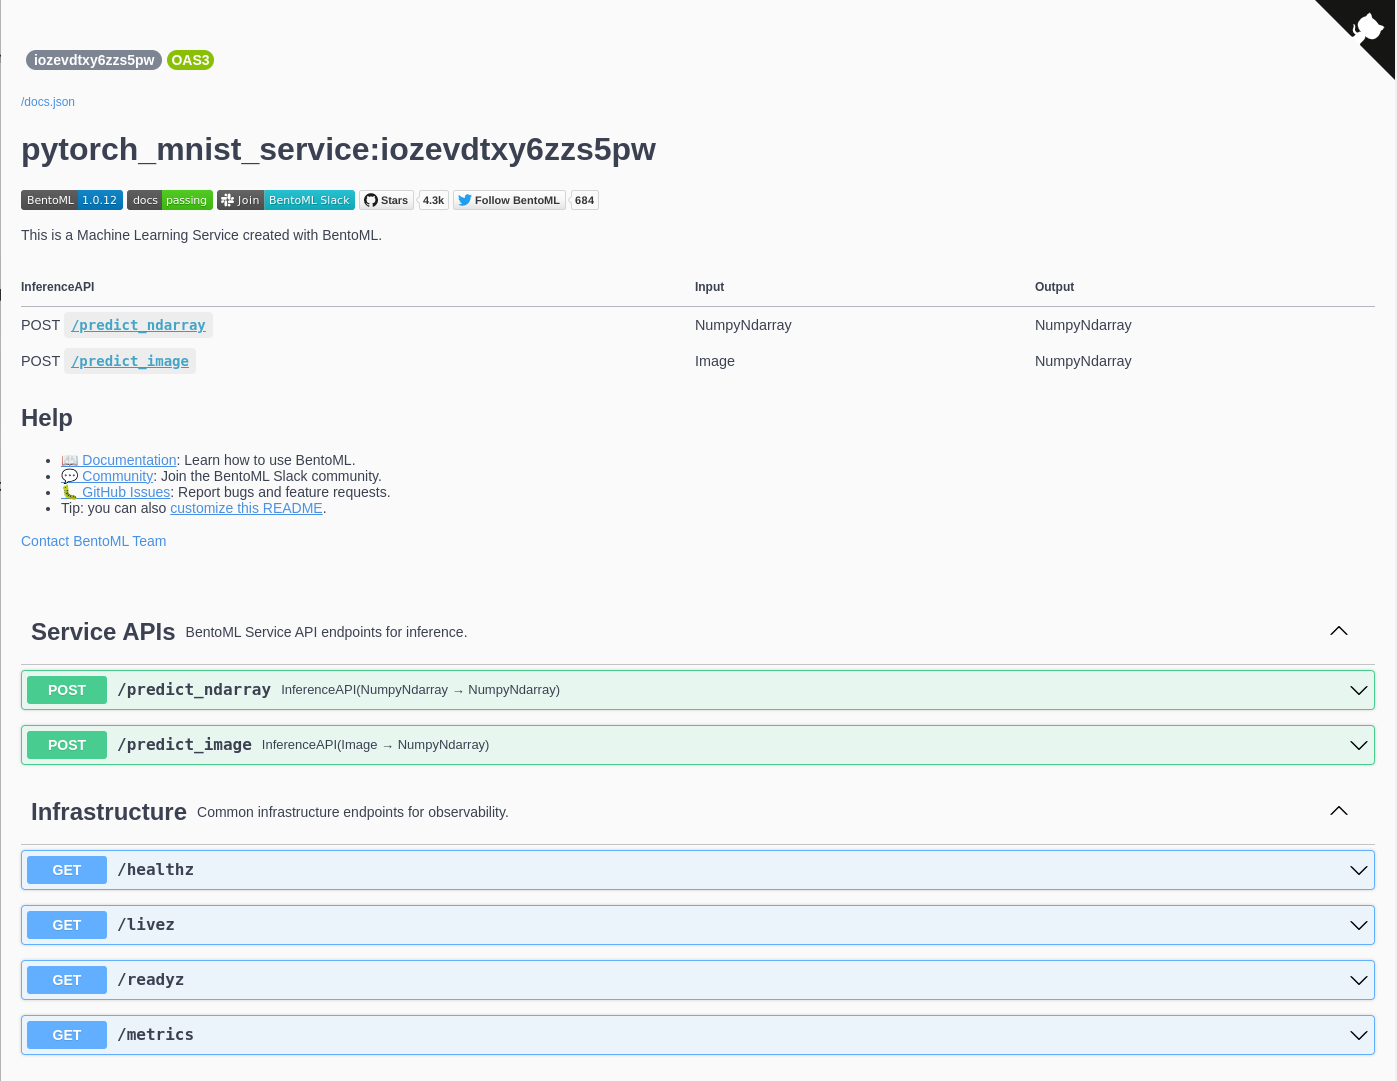
In the Swagger UI, we can see more details about the deployed Bento:
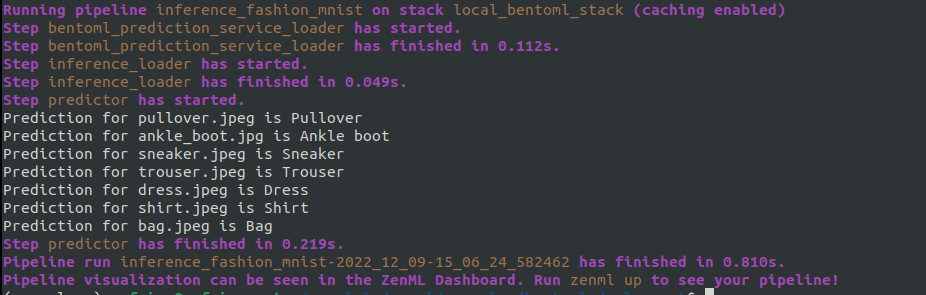
Inference Pipeline:
To make use of our deployed model the example comes with an inference pipeline which is a set of steps that use some image samples to run predictions on. You can find the code of this pipeline and more in the bentoml_deployment example.
From Local to Cloud:
Once a model server has been deployed and tested locally, it can be deployed to a cloud provider using bentoctl, a command-line interface (CLI) tool for managing BentoML deployments on cloud providers. Bentoctl currently supports AWS, GCP, and Azure, and requires that you have an account with one of these providers as well as the corresponding CLI tools and Docker and Terraform installed on your machine.
To use bentoctl, you will need to first install it using the following command:
pip install bentoctlIn this example, we will deploy the BentoML model that we built using ZenML to AWS Sagemaker. To do this, we first need to install the necessary dependencies:
zenml integration install aws s3
bentoctl operator install aws-sagemaker
Once these dependencies are installed, we can initialize our BentoML deployment by running the following command:
bentoctl initNext, we will build a Docker image using the BentoML model that we built in the training pipeline. This can be done with the following command:
bentoctl build -b $BENTO_TAG -f $DEPLOYMENT_CONFIG_FILEFinally, we can deploy our model to AWS Sagemaker by running the apply command:
bentoctl applyThe full code for this example is available on GitHub.
In conclusion, training and deploying a machine learning model can be a complex and time-consuming process. By using the ZenML pipeline and BentoML integration, we were able to streamline this process and easily deploy our model both locally and in the cloud. This allowed us to quickly and easily test and deploy our model, saving us valuable time and resources. Overall, the use of ZenML and BentoML proved to be a valuable tool in our machine learning workflow.