
On this page
The recent news of Neptune.ai being acquired by OpenAI shows how critical the experiment tracking has become in the AI research world. As a part of this acquisition, Neptune has announced it will wind down its hosted service by March 4, 2026, giving existing SaaS customers a 3-month transition period to export their data and migrate to alternative tools.
If you’re a Neptune customer facing this change (or a decision-maker overseeing ML infrastructure), this is the right moment to explore your options.
Neptune has long been a beloved experiment tracker, known for its focus on logging metrics, training insights, and model artifacts at scale. More importantly, ZenML and Neptune have always shared a similar vision of streamlined MLOps.
This article explores how ZenML covers the same experiment tracking needs that Neptune did (and more), and how teams can smoothly switch from Neptune to ZenML. Crucially, this isn’t an adversarial comparison – in fact, Neptune’s team integrated their product with ZenML in the past, and we see this transition as an opportunity for Neptune’s community, not a setback.
Beyond Experiment Tracking: What to Look for in a Neptune Replacement
Experiment tracking is an essential part of any ML workflow – keeping tabs on metrics, hyperparameters, model versions, etc. Neptune excelled at this, offering a flexible metadata store and rich UI for comparing runs.
Competing tools like Weights & Biases (W&B) or MLflow can similarly log and visualize experiments. However, you will eventually realize that an experiment tracker alone isn’t enough for sustainable, scalable MLOps.
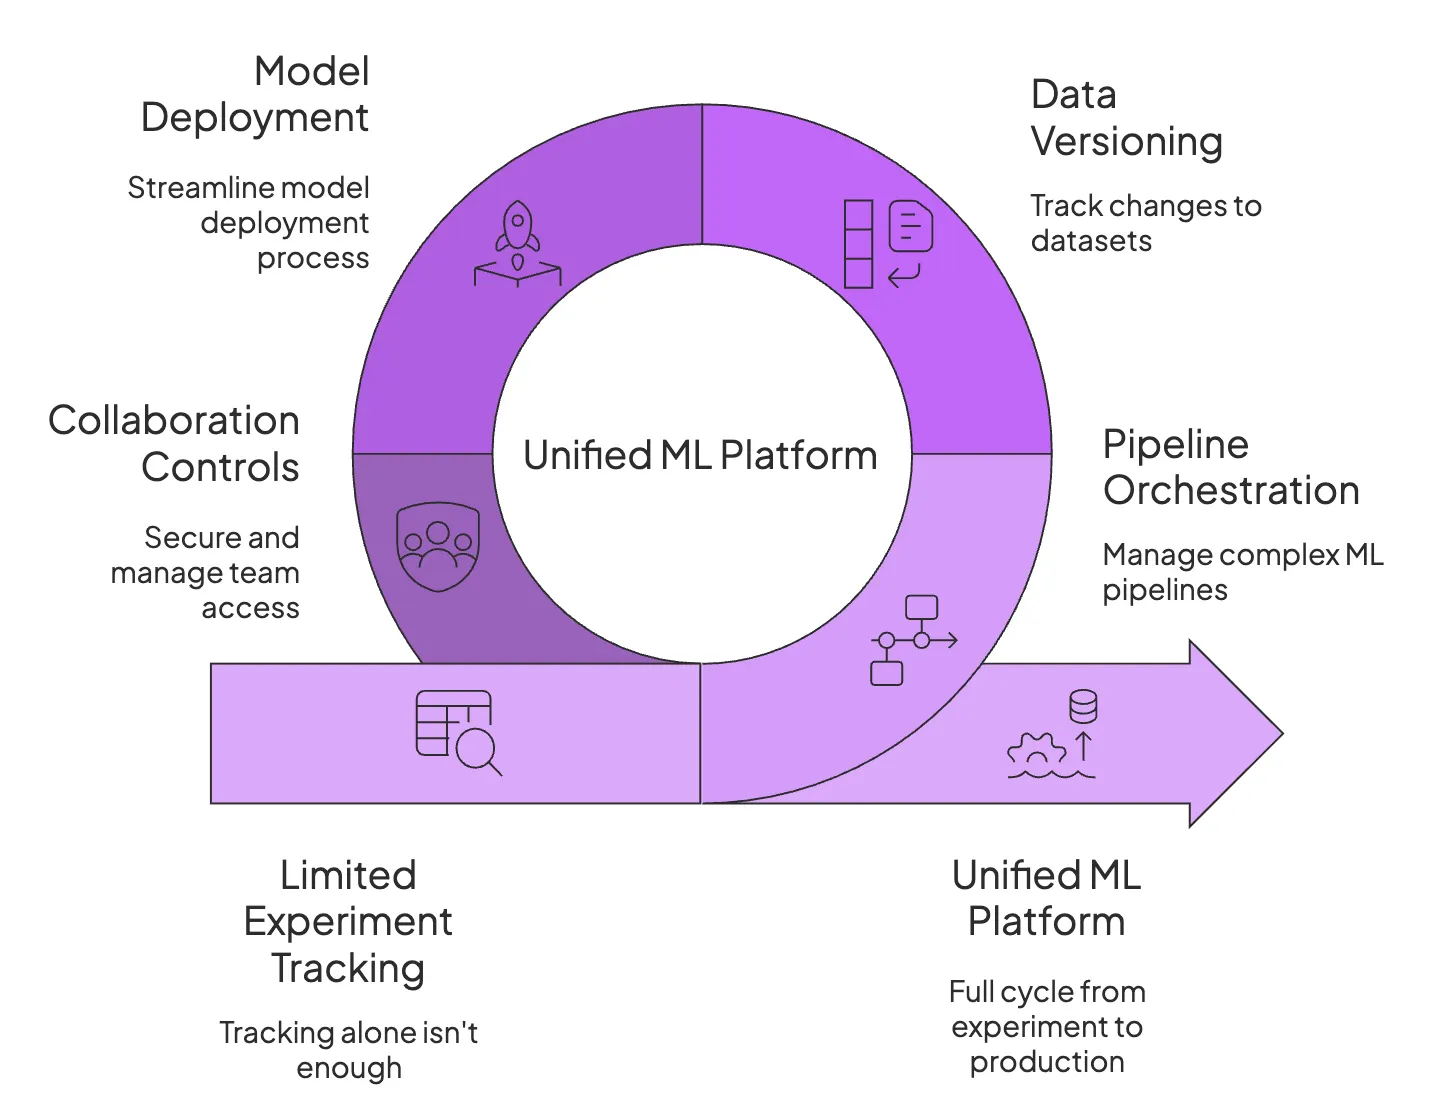
As projects grow, you often need features like pipeline orchestration, data and artifact versioning, model deployment workflows, and collaboration controls; capabilities that pure tracking tools don’t provide.
Neptune itself focused solely on tracking, leaving teams to rely on complementary tools for other lifecycle stages, like data prep, model serving, and workflow automation.
MLflow, while open-source, also leaves orchestration and reproducibility largely as ‘DIY’ tasks for the user. This is why many organizations outgrow single-purpose trackers and gravitate toward platforms that treat pipelines as first-class citizens and bundle experiment tracking with artifact versioning and reproducibility.
In choosing your Neptune replacement, it’s worth asking: Do we want just another experiment logger, or a more unified ML platform that covers the full cycle from experiment to production?
How ZenML Covers (and Extends) Your Experiment Tracking Needs
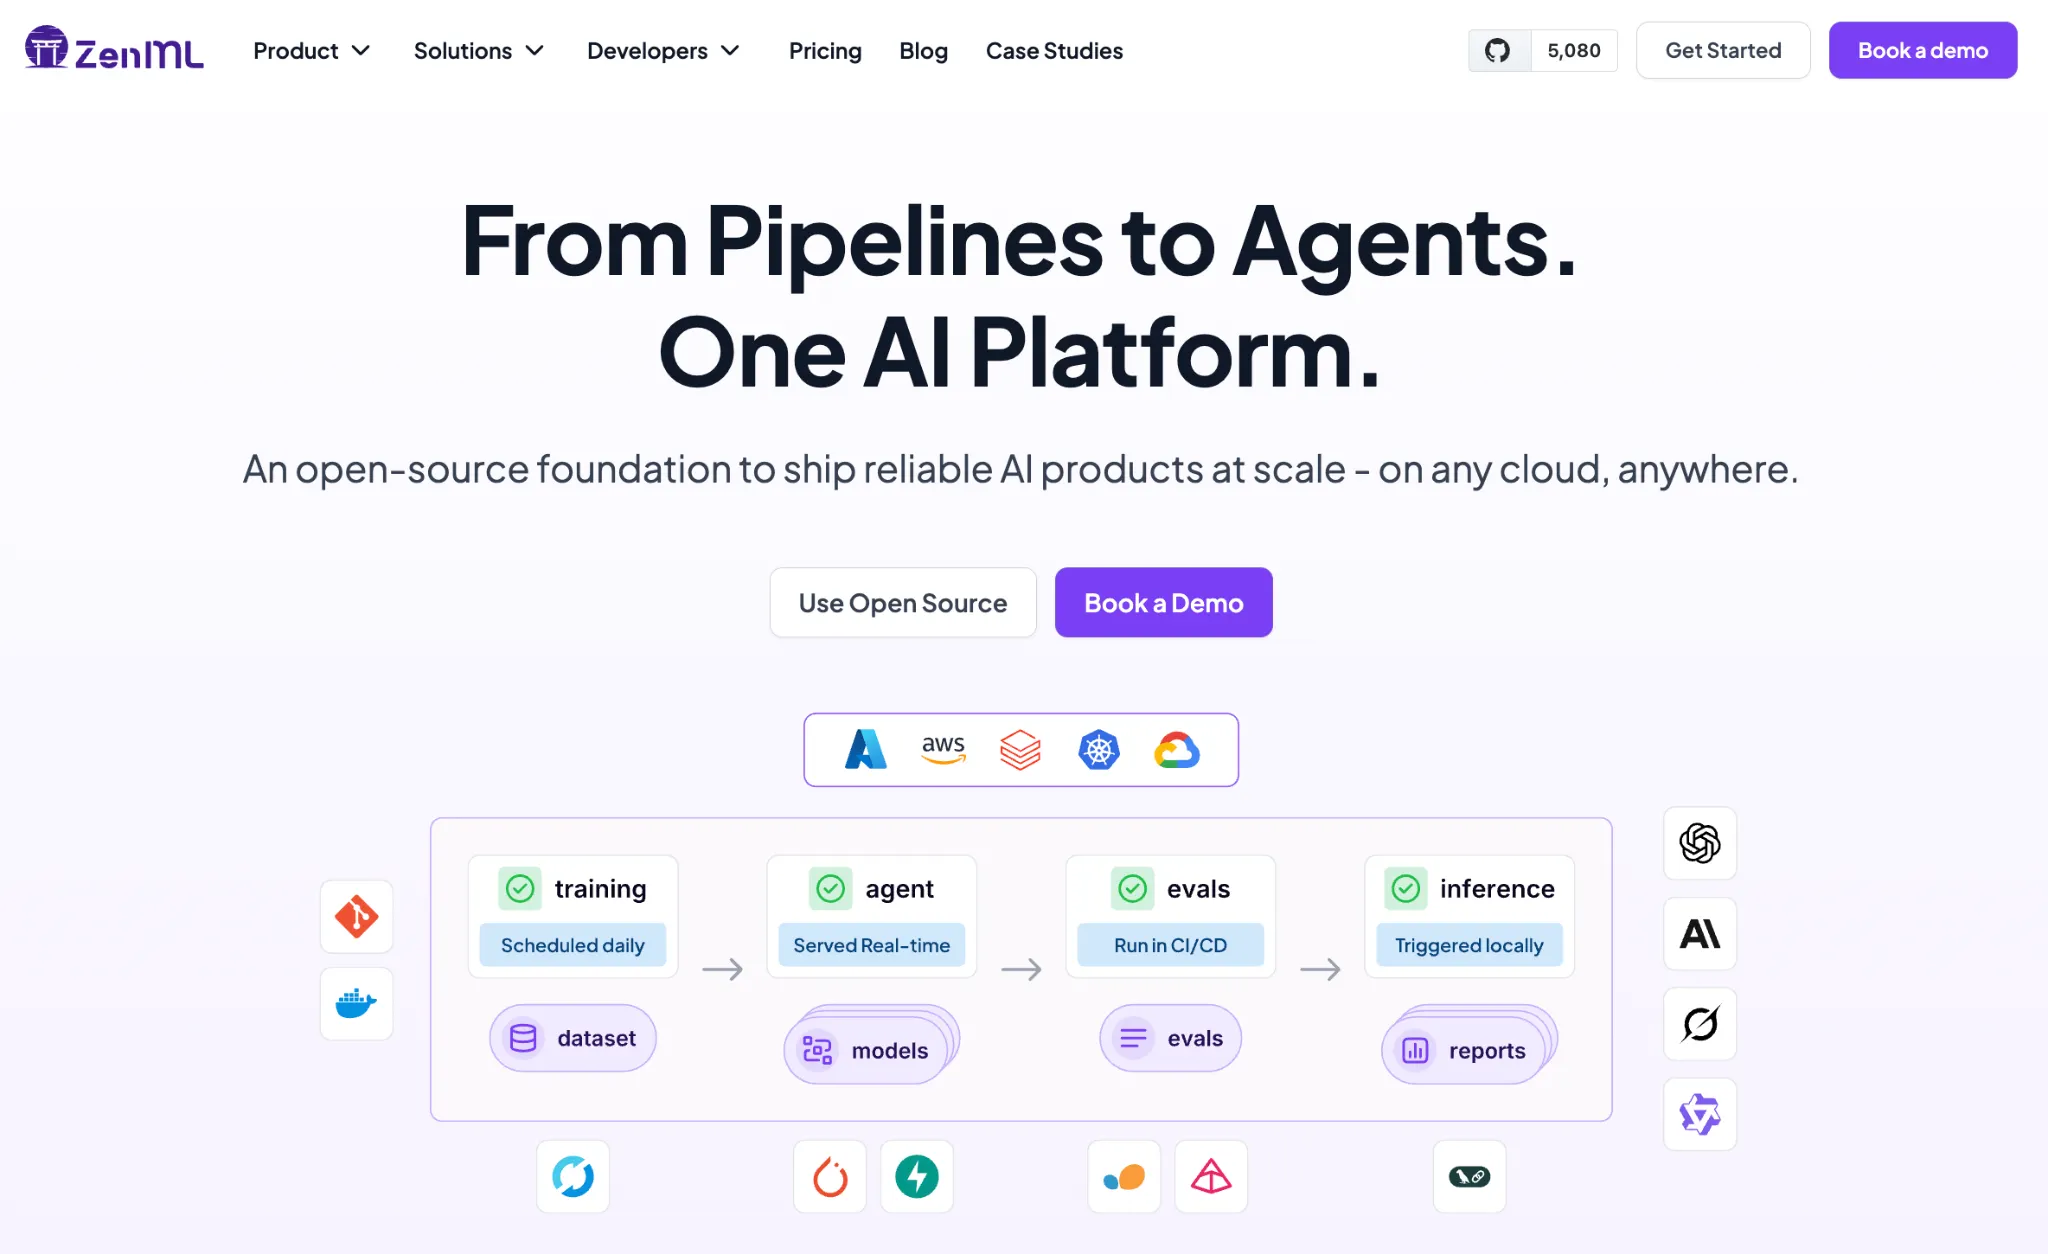
ZenML is an open-source MLOps framework that offers experiment tracking plus a whole lot more. Think of ZenML as a unified ML platform rather than just a tracking database.
With ZenML, you define your ML pipelines (data prep, training, evaluation, deployment steps, etc.) in code and let ZenML handle the orchestration, metadata logging, and even deployment triggers in a consistent, reproducible way.
1. From Runs to Pipelines: A Different Lens on Experiments
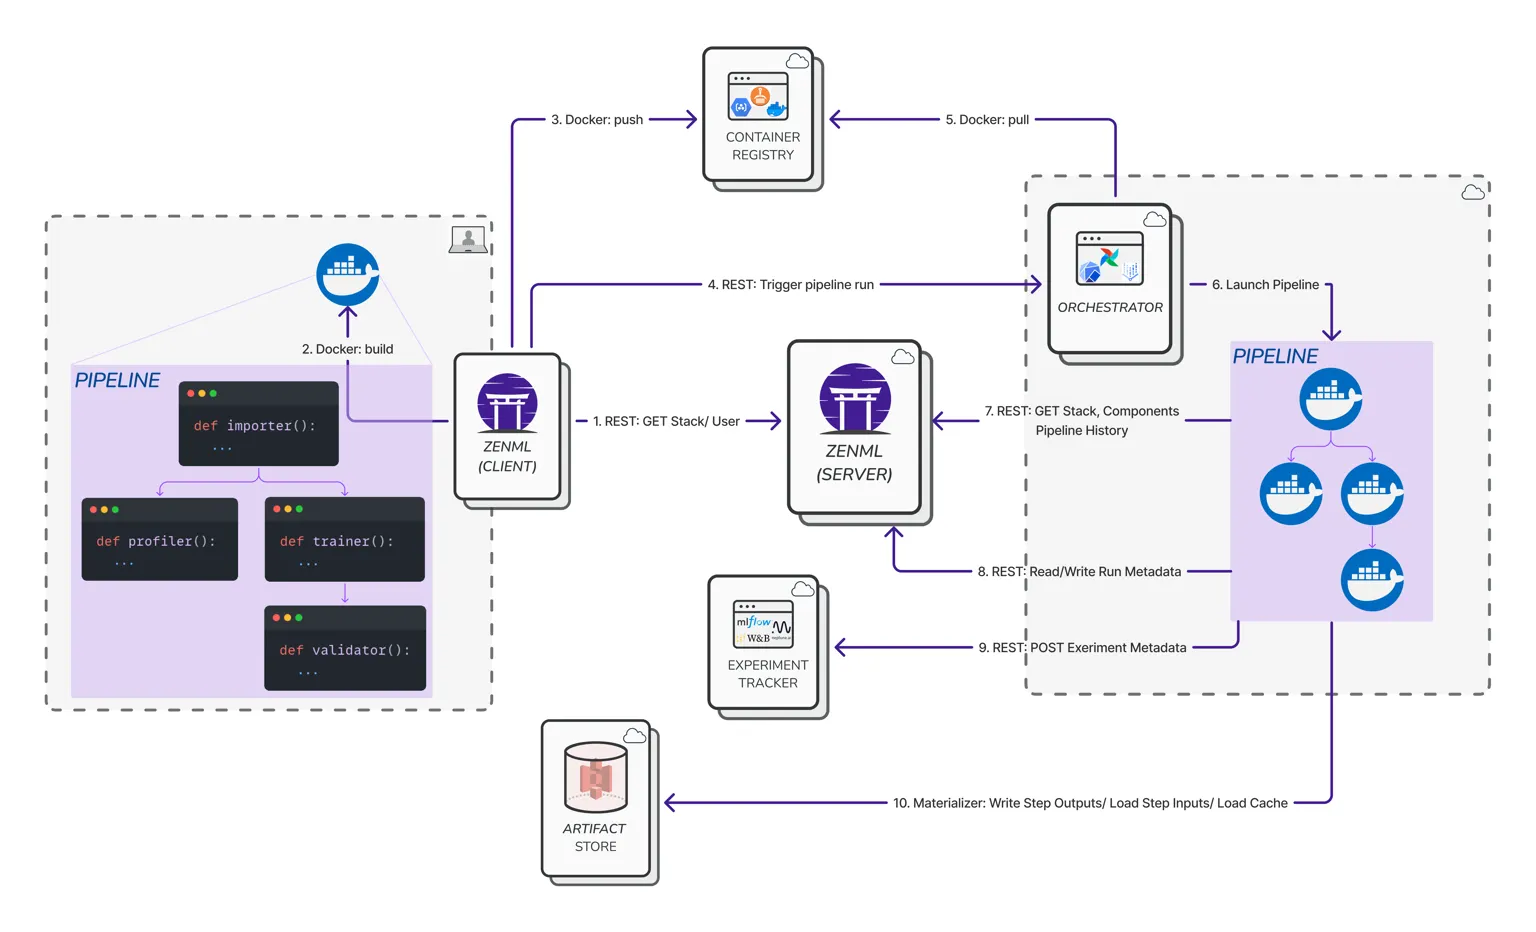
In ZenML, every experiment run is viewed through the lens of a pipeline. Instead of just tracking individual training runs in isolation, ZenML tracks the entire pipeline that produced those results. Every pipeline run in ZenML is considered an experiment, complete with rich metadata about each step, its inputs/outputs, parameters, and environment.
You still get metrics and metric comparisons as you did in Neptune, but with added context; you know:
- Which orchestrator and infrastructure ran the pipeline
- What data inputs were used
- How that run might have led to a deployed model down the line
This pipeline-centric approach means your experiments aren’t just floating point scores – they’re connected to the code, data, and environment that produced them.
If you transition to ZenML, you will find that your experiments now include information like which pipeline steps were executed, in what order, on which compute resource, producing which artifacts.
2. Auto-Tracking and Lineage without Extra Glue Code
One major advantage of ZenML is that it auto-tracks everything in your ML workflow right from the start. When you run a ZenML pipeline, the framework automatically logs each step execution, the parameters and configs, and all artifacts produced – without you writing custom logging code.
Every dataset passed between steps, every model file saved, every evaluation report generated becomes an artifact tracked by ZenML’s artifact store, complete with versioning and lineage info.
This built-in artifact tracking yields a complete lineage for your experiments. You can trace, for example, which data version and preprocessing code led to a specific model artifact.
ZenML also captures metadata like source code version (Git commit hashes), execution environment, and other run metadata automatically. This means reproducibility comes for free – you can always pinpoint which code and inputs produced a model, something that’s crucial for debugging and audits.
In Neptune, you might have often logged such metadata manually (like recording the Git commit ID); ZenML eliminates that manual logging by integrating with your code repository and pipeline steps to log it all for you.
As a result, when something goes wrong in an experiment, ZenML’s lineage tracking can help you quickly answer when and how a model was trained, with which data, and even which hyperparameters – all without extra glue code.
3. Experiment Comparison in the ZenML Dashboard
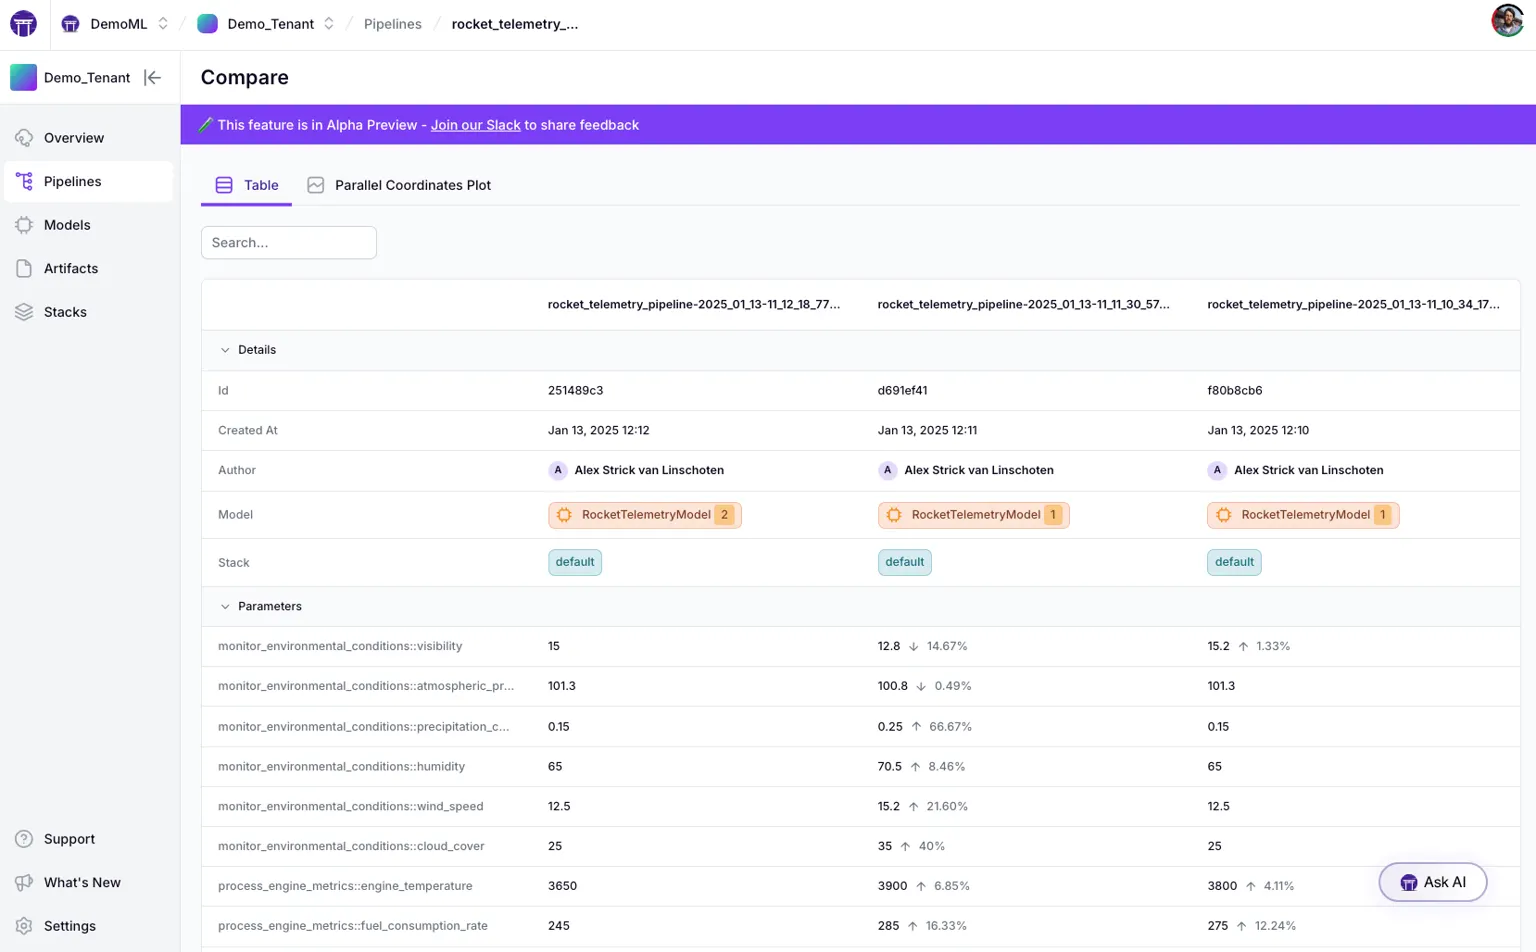
Experiment tracking isn’t useful if you can’t easily compare results. ZenML’s web-based dashboard provides powerful experiment comparison tools (especially in ZenML Pro) to analyze your pipeline runs side by side. You can select multiple pipeline runs and compare their metrics and metadata across runs visually.
For example, if you ran an experiment with different hyperparameters in 5 runs, ZenML’s dashboard can tabulate all the runs’ metrics and even highlight the differences for each run. It’s not limited to model accuracy metrics either – any metadata or metrics logged (including operational metrics like latency, resource utilization, data statistics, etc.) can be compared.
ZenML offers both a table view (for exact numbers and changes between runs).
And a parallel coordinates view for spotting trends and correlations across dozens of runs.
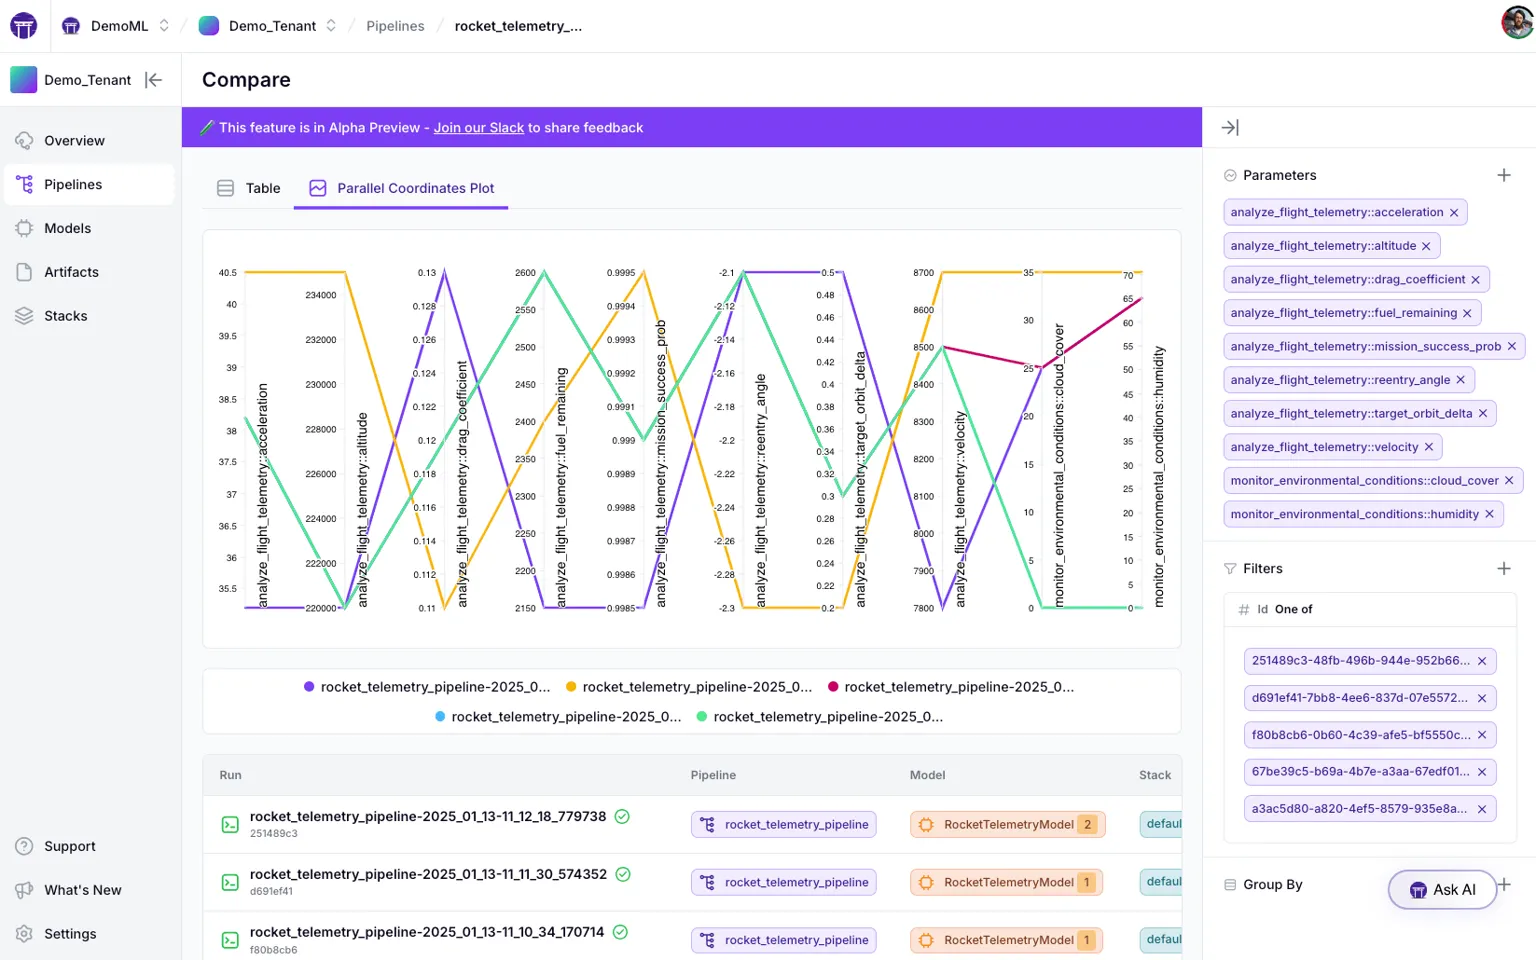
This means you can easily spot, say, how training time vs. accuracy trade off across runs, or how a change in data input affects multiple outcome metrics.
Being a Neptune user, you might know how efficient and easy it is to track experiment runs visually – ZenML provides that too, within its unified dashboard.
This means you can easily spot, say, how training time vs. accuracy trade off across runs, or how a change in data input affects multiple outcome metrics. Neptune users will recall the joy of visually comparing experiment runs – ZenML provides that too, within its unified dashboard. By having experiment comparison built into the pipeline platform, ZenML helps you derive insights not just from one experiment, but from the aggregate of all your experiments over time.
👀 Note: The experiment comparison feature with advanced visualizations is part of ZenML’s Pro offering, but even the open-source version lets you browse and filter runs and their metrics in the dashboard. The core idea remains – you won’t lose the ability to analyze trends across experiments.
Keep Your Favorite Trackers - ZenML Wraps Around Them
Adopting ZenML doesn’t mean you must abandon other tools you love. In fact, ZenML is designed to integrate with external experiment trackers like Neptune, Weights & Biases, MLflow, and many others.
This is a huge advantage for teams coming from Neptune: you can keep using the Neptune UI and API (or any other tracker) if you want, while ZenML manages the pipeline and infrastructure around it.
ZenML’s philosophy here is “bring your own experiment tracker” – your pipeline steps can still log to Neptune (or W&B, etc.) through ZenML’s Experiment Tracker integration.
Why is this useful?
Suppose your team loves Neptune’s interface or has scripts built around Neptune’s API. With ZenML, you can register a Neptune experiment tracker as a component of your stack, and whenever your ZenML pipeline runs, it will also sync metrics to Neptune.
So ZenML can wrap around Neptune during your transition. This softens the migration – your team can get used to ZenML’s way of doing pipelines without immediately losing the familiar Neptune dashboards.
It also means if you decide to switch to a different experiment tracker (say W&B or MLflow), ZenML can accommodate that by swapping out one stack component. The rest of your workflow (pipelines, steps, etc.) stays the same.
For Neptune’s users facing its shutdown, this is especially relevant: even if you ultimately need to move off Neptune’s platform, ZenML can serve as an “outer loop” that coordinates experiments and lets you plug in a new experiment tracking backend underneath.
In fact, Neptune’s own docs suggested using their exporter to migrate data to alternatives like W&B or MLflow – ZenML goes a step further and enables you to keep the concept of an experiment tracker while fundamentally upgrading your MLOps stack to pipelines.
Beyond Experiment Tracking – What ZenML Adds on Top
Neptune focused on experiment tracking and excelled at it. ZenML offers that plus a complete MLOps foundation around it. Migrating to ZenML means you’re not just replacing a tracker; you’re upgrading to a platform built for modern AI systems.
- One platform for all AI workflows: ZenML lets you track and manage traditional ML models, RAG pipelines, and AI agents in one place. The same pipeline abstractions (steps, pipelines, artifacts) apply whether you’re training a scikit-learn model or running a multi-step LLM workflow with retrieval and tools. Everything that powers those systems, data versions, prompt templates, and agent configs is automatically tracked. Instead of juggling separate tools for each project type, ZenML becomes your single source of truth across all AI initiatives.
- GenAI and LLM Support: If your work is venturing into large language models or generative AI, ZenML is built to handle that, too. It's used in LLMOps contexts (Large Language Model Ops), where tracking becomes even more complex (think thousands of per-layer metrics, multi-step agent pipelines, etc.). ZenML's pipeline engine has been proven at enterprise scale – for example, JetBrains used ZenML to orchestrate massive agentic pipelines with over 3,000 nodes for LLM evaluation. Whether it's traditional ML or cutting-edge foundation models, ZenML provides the stability and scalability to track and manage those experiments. (And you can still integrate an LLM-friendly experiment tracker UI on top, such as W&B, which ZenML supports.)
- Open Source, extensible, and infra-agnostic: ZenML is open-source and designed to fit your environment, not the other way around. Swap orchestrators, storage, or experiment trackers without rewriting pipeline code. Need MLflow, Weights & Biases, or even Neptune during your transition? Just plug them into the stack. With 50+ integrations and a flexible component system, ZenML evolves with your tooling, rather than locking you into a single vendor ecosystem.
How to Migrate from Neptune to ZenML
If you’re a Neptune user preparing for the transition, the migration to ZenML can be done in a few straightforward steps.
Step 1. Install ZenML and Set Up the Basics
First, install the ZenML framework (it’s a single Python package): pip install zenml. If you were using Neptune via pip, this is analogous to adding a new tool. Then, initialize a ZenML repository in your project (run zenml init in your code base directory) to set up ZenML’s config.
Step 2. Define Your Stack (Orchestrator and Artifact Store)
In ZenML, you need to configure a stack, which at minimum consists of an Orchestrator (for running pipelines) and an Artifact Store (for storing experiment artifacts). This is the infrastructure setup step.
For example, you might register a local orchestrator and a local artifact store to start: zenml stack register default_stack -o default -a local. (You can also use cloud options like a Kubernetes orchestrator or S3 artifact store later.) The key idea is to point ZenML to where it should run things and store outputs.
# List all stacks
zenml stack list

# Register a new stack with minimal components
zenml stack register my-stack -a local-store -o local-orchestrator

# Register a stack with additional components
zenml stack register production-stack \
    -artifact-store s3-store \
    --orchestrator kubeflow \
    --container-registry ecr-registry \
    --experiment-tracker mlflow-tracker
Alternatively, you can also create and manage stacks through the Python API:“
from zenml.client import Client

client = Client()
# List all stacks
stacks = client.list_stacks()

# Set active stack
client.activate_stack("my-stack")
Step 3. Port Your Training Code into a ZenML Pipeline
Take the core of your training script (the code that reads data, trains a model, evaluates it) and wrap it into ZenML’s pipeline/step format. This typically means decorating your functions with @step (to define reusable steps) and then assembling them in a @pipeline function.
You can often reuse your existing code with minimal modifications; ZenML doesn’t force a rewrite of your modeling logic. For instance, if you had train_model() and evaluate_model() functions, you can make them ZenML steps and then create a pipeline that runs them in sequence.
The result is that running this pipeline will automatically track all the metrics, parameters, and artifacts produced (without needing explicit neptune.log_metric() calls sprinkled throughout).
Step 4. Run the Pipeline and Visualize in ZenML
Execute your ZenML pipeline (e.g., via zenml run or by calling it in a Python script). This will trigger the orchestrator to run your training steps.
Once finished, you can bring up the ZenML Dashboard (with zenml up for local, or by logging into the hosted dashboard if using ZenML Pro) to see your experiment.
Essentially, this is the point where you confirm, “Okay, all the stuff I used to track in Neptune is now appearing in ZenML’s interface.”
Step 5. Optional: Bridge with Neptune During Transition
If you still want to use Neptune’s UI until it sunsets, or you have a trove of historical Neptune logs to incorporate, you can leverage ZenML’s Neptune integration.
You can configure your ZenML pipeline steps to use a Neptune experiment tracker component so that whenever a ZenML run happens, it also logs to Neptune. This dual-logging approach can be a temporary measure during the switch.
📚 Read comparisons of different experiment trackers:
This Isn’t a Neptune vs ZenML Story
Neptune’s chapter as an independent experiment tracker may be closing, but this is an opportunity for your team to upgrade your MLOps stack.
By moving to ZenML, you’re not just avoiding the Neptune shutdown – you’re gaining a robust, future-proof platform that covers experiment tracking and much more.
ZenML will allow you to log all the same metrics and metadata you tracked in Neptune (and you can even continue using familiar UIs like W&B if you want), while also giving you pipeline reproducibility, artifact lineage, deployment workflows, and flexibility that Neptune alone couldn’t offer. Plus, ZenML’s open-source core means you won’t be caught off-guard by a vendor acquisition again.
Ready to take your experiment tracking to the next level? ZenML’s open source is free to try, and you can get started by migrating a simple pipeline to ZenML to see the benefits firsthand.
If you’d like a guided tour of how ZenML can specifically replace Neptune in your setup, our team is here to help. Book a demo with us today and learn how ZenML can become your experiment tracker and help you accelerate your journey from research experiments to reliable, production-grade AI.